Popular


Steps to Create a Re-engagement Activity in ModernLMS
Step 1: Add a New Activity
On the course page, click the + Add an activity or resource button or the + icon within the desired course section.
System Behaviour:
The system displays a list of all available activities and resources that can be added to the course.
Step 2: Select Re-engagement Content
From the activity list, select Re-engagement.
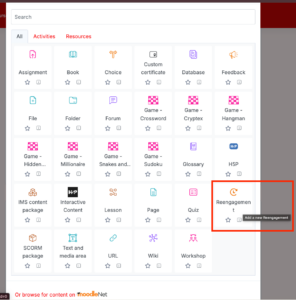
System Behaviour:
The Re-engagement activity type is selected and the system navigates to the Re-engagement configuration page.
Step 3: Enter General Information
In the General section:
-
Enter the Re-engagement Name
-
Example: Course Completion Reminder
-
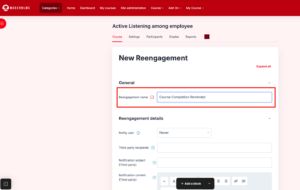
System Behaviour:
The entered activity name is displayed in the input field and will be used as the title of the Re-engagement activity within the course.
Step 4: Configure Re-engagement Details
In the Re-engagement Details section:
-
Locate the Notify User field.
-
Select After Delay from the dropdown list.
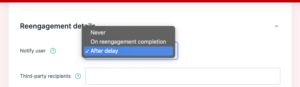
Explanation:
-
After Delay – Learners will receive an automated email notification after a predefined delay period (grace period) set within the Re-engagement configuration.
-
This option is typically used to remind learners who have not completed the course or required activities within the specified timeframe.
Note:
For system testing purposes, select After Delay to verify that delayed email notifications are triggered correctly.
System Behaviour:
The selected notification method is saved under the Notify User configuration.
Re-engagement Notification Configuration
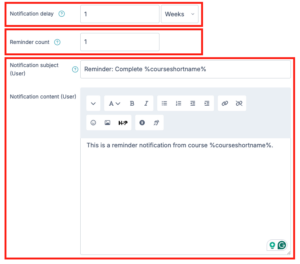
1. Notification Delay
Purpose:
Defines how long the system waits before sending the first re-engagement notification to the learner.
How it works:
-
The delay countdown starts when the Re-engagement condition is met
(for example, the learner has not completed the course or required activity). -
The value consists of:
-
A number (e.g.
1) -
A time unit (Minutes, Hours, Days, Weeks)
-
Example:
-
1 Week
→ The system sends the first reminder one week after the learner becomes eligible for re-engagement.
Use case:
Suitable for giving learners a grace period before sending reminder emails.
2. Reminder Count
Purpose:
Determines how many reminder notifications will be sent to the learner.
How it works:
-
The system sends reminders based on the configured delay.
-
Each reminder is sent sequentially until the reminder count is reached.
Example:
-
Reminder count =
1
→ The learner receives one reminder only. -
Reminder count =
3
→ The learner receives three reminder emails, spaced according to the delay rules.
Use case:
Prevents excessive notifications while ensuring learners receive sufficient follow-up.
3. Notification Subject (User)
Purpose:
Specifies the email subject line that the learner will see when receiving the re-engagement notification.
How it works:
-
This text appears as the email subject.
-
Supports dynamic placeholders (variables), such as:
-
%courseshortname% -
%fullname%(if enabled)
-
Example:
Use case:
A clear and concise subject improves email open rates and user attention.
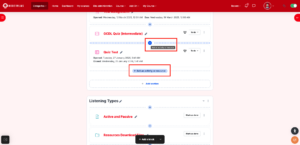
Step 5: Save and Preview the Activity
Click the Save and display button.
System Behaviour:
-
The system saves the Re-engagement activity settings.
-
The newly created Re-engagement activity appears in the course content list.

Outcome
Once completed:
-
The Re-engagement activity is successfully added to the course.
-
Automated reminder notifications will be sent to learners based on the configured delay and notification rules.
-
Administrators and instructors can monitor re-engagement effectiveness through course activity and completion reports.